
>>

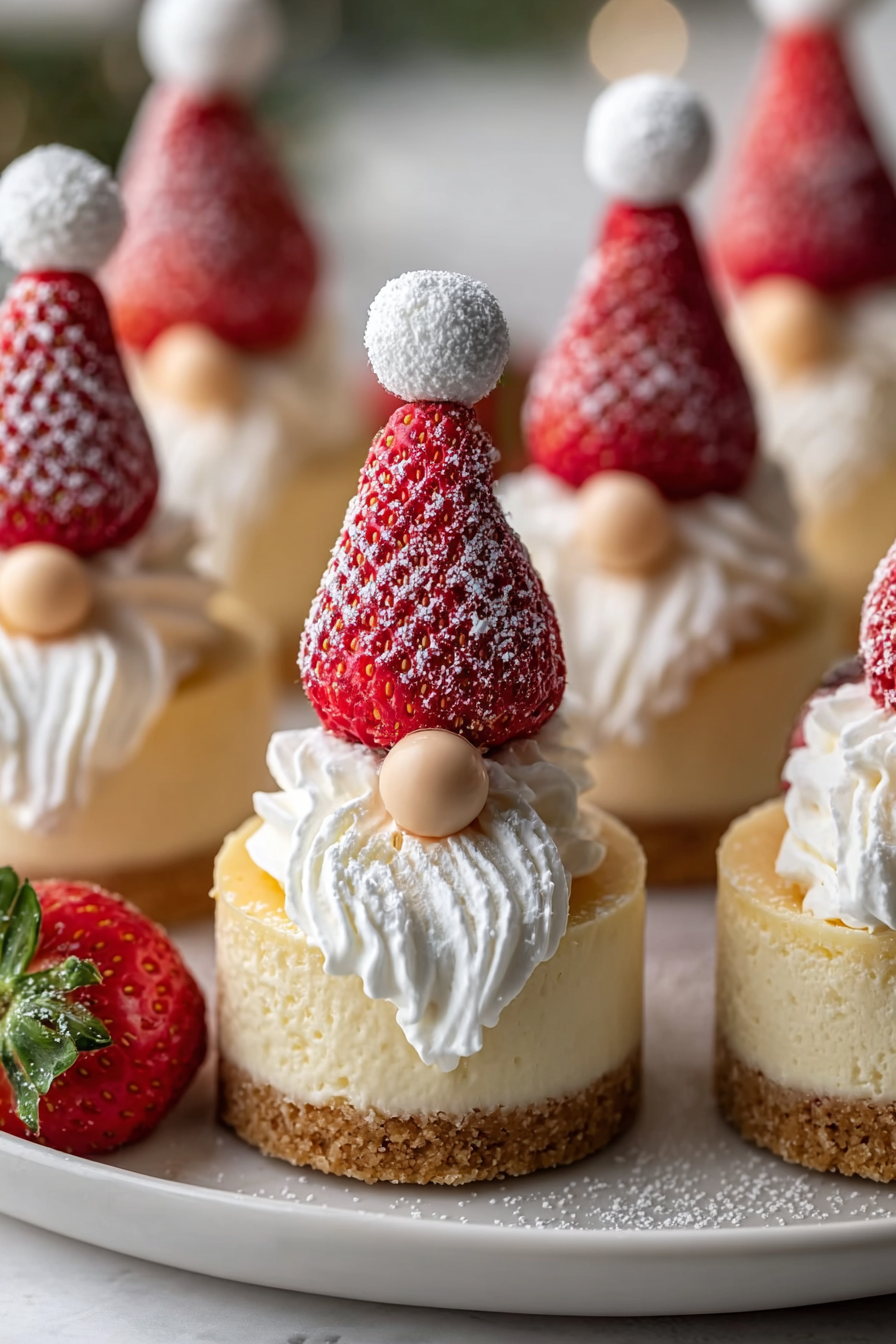
Adorable single-serve cheesecakes topped with strawberries, whipped cream and tiny white chocolate noses—perfect for parties and holiday treats.
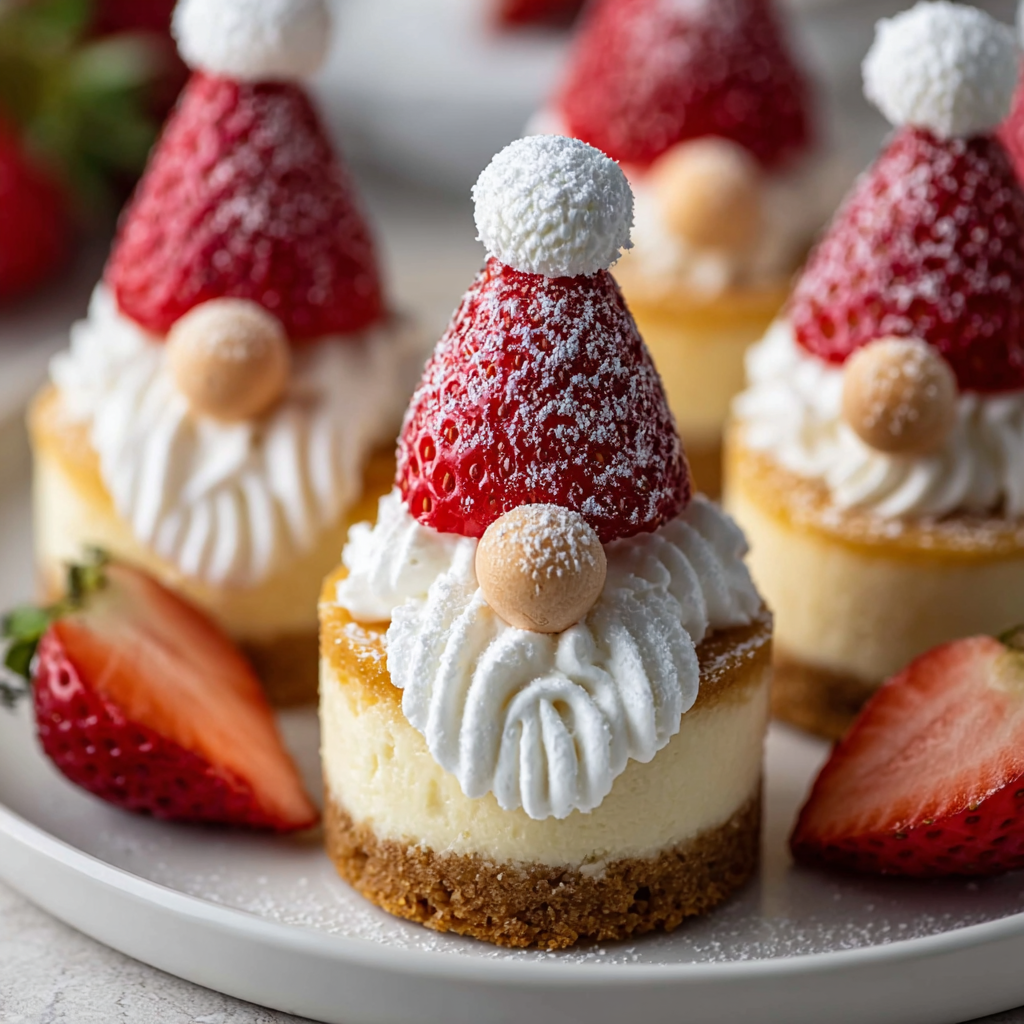
This whimsical batch of Gnome Mini Cheesecakes began as a playful idea the first winter I wanted something festive but simple to share with neighbors. I was carving out time for a small baking session between errands and wanted an individual dessert that looked special without a long ingredient list. The result felt like Christmas and spring at once: tangy, creamy filling, crumbly graham crust, a bright strawberry hat and a dollop of whipped cream beard. Everyone who tried one smiled immediately.
I first discovered how effective this format is when testing desserts for a small holiday market. The single-serve size meant minimal packaging and easy transport, and the strawberry hats kept the presentation fresh and bright. Texture is the star here: a slightly crisp crust gives way to a silky, lightly tangy center while the whipped cream adds billowy softness. These little treats are memorable because they balance nostalgia with a bit of fun, and they travel well whether you are taking them to a potluck or arranging them on a dessert table.
In my experience these get eaten first at any gathering. Family members keep asking for the “gnome ones” and I love that they are small enough to enjoy without feeling guilty. They also gave me the confidence to experiment with other small-format desserts for markets and holiday trays.
My favorite part is the reveal when guests lift the strawberry hat to see the cream beneath. Children have delighted faces and adults often ask for the recipe. I once brought a dozen to a neighbor’s book club and they were the topic of conversation through dessert and coffee.
Store finished cheesecakes in a single layer in an airtight container in the refrigerator for up to 48 hours. If you need to stack them, separate layers with parchment paper to protect the whipped cream. For longer storage, freeze un-decorated cheesecakes on a baking sheet until solid, then transfer to a freezer-safe container for up to three months. Thaw overnight in the refrigerator and decorate just before serving. Reheat is not necessary; serve chilled for best texture.
For a gluten-free version, swap graham crackers with a certified gluten-free cracker or use ground almonds plus a tablespoon of sugar for a nutty alternative. Replace sour cream with full-fat plain Greek yogurt for a slightly tangier profile. Use low-sugar or light cream cheese if you prefer lower calories, though texture will be slightly firmer. For a dairy-free version you would need a plant-based cream cheese and an egg substitute, but expect differences in setting and flavor.
Serve these on a tiered stand for parties or arrange them on a rustic wooden board with extra strawberries, mint sprigs and a small bowl of extra whipped cream. They pair nicely with coffee, espresso or a light dessert wine. For a kid-friendly event, offer small sprinkles or colored candy pearls so guests can personalize their gnomes.
Miniature cheesecakes are an adaptation of classic American-style baked cheesecake presented in single-serve format. The idea of decorating small treats as characters taps into modern party trends where presentation is as important as flavor. Using graham crackers for the base reflects a traditional American pantry staple that dates back to the late 19th century.
Swap the strawberry hat for a halved blueberry and a mint leaf in summer for a fresh look. For winter holidays use candied cranberries and a dusting of extra powdered sugar. In fall, top with a small cinnamon-spiced pear slice and a sprinkle of toasted pecans to echo seasonal flavors.
Bake the bases and the filling a day ahead and keep chilled. Store decorations separately and assemble right before serving to preserve the whipped cream’s texture. If transporting, place cheesecakes in a single layer in a shallow box with cooling packs to keep them stable and prevent melting.
These Gnome Mini Cheesecakes are a small project with a big payoff. They bring smiles and are flexible enough to match many occasions while remaining quick and forgiving to prepare. Enjoy making them your own and share one with a friend.
Bring cream cheese and eggs to room temperature to ensure a silky, lump-free filling.
Tap the muffin tin gently before baking to release large air bubbles and reduce cracking.
Chill the cheesecakes thoroughly before decorating to keep the whipped cream from melting.
Press the crust firmly with a flat-bottomed glass for an even base that holds together when sliced.
This nourishing gnome mini cheesecakes recipe is sure to be a staple in your kitchen. Enjoy every moist, high protein slice — it is perfect for breakfast or as a wholesome snack any time.
This Gnome Mini Cheesecakes recipe makes perfectly juicy, tender, and flavorful steak every time! Serve with potatoes and a side salad for an unforgettable dinner in under 30 minutes.
Preheat oven to 325 degrees Fahrenheit. Line a 12-cup muffin tin with liners. Mix graham crumbs, melted butter and sugar and press about 2 teaspoons into each liner to form the crust.
Beat softened cream cheese until smooth. Add sugar and vanilla and beat until combined. Add eggs one at a time, then fold in sour cream or yogurt until silky. Avoid overmixing.
Spoon filling into crust-lined cups to three quarters full. Tap to release air bubbles. Bake 15 to 18 minutes until set at the edges and slightly jiggly in the center.
Cool the tin to room temperature for about 30 minutes then refrigerate for at least 2 hours or overnight for best texture.
Top each chilled mini cheesecake with whipped cream for the beard, invert a strawberry half as the hat and add a small chocolate chip or candy pearl for the nose. Dust with powdered sugar.
Last Step: Please leave a rating and comment letting us know how you liked this recipe! This helps our business to thrive and continue providing free, high-quality recipes for you.
Leave a comment & rating below or tag
@easywhiskrecipes on social media!

A quick and comforting one pot dinner of tender chicken, creamy rice, and vegetables cooked together in the Instant Pot for an easy weeknight meal.

Fluffy pancakes swirled with a warm cinnamon filling and finished with a silky cream cheese glaze. Perfect for weekend brunches and cozy mornings.

Buttery graham crust, creamy cheesecake, spiced Granny Smith apples, crunchy streusel, and a ribbon of homemade caramel — perfect dessert bars for gatherings.
Leave a comment & rating below or tag @easywhiskrecipes on social media!
Enjoyed this recipe? Share it with friends and family, and don't forget to leave a review!
This recipe looks amazing! Can't wait to try it.
Comments are stored locally in your browser. Server comments are displayed alongside your local comments.

Join to receive our email series which contains a round-up of some of our quick and easy family favorite recipes.
