
Oven-Baked Cheesy Tacos

A simple, crowd-pleasing oven-baked take on classic tacos: seasoned beef tucked into crunchy shells, topped with melty cheese and fresh garnishes for an easy weeknight winner.

This oven-baked cheesy tacos recipe is my go-to for busy weeknights when I want something that tastes like takeout but comes together faster and with less fuss. I first adapted this method when I needed to feed a house full of hungry guests and wanted a hands-off finishing step that guaranteed warm, crisp shells and perfectly melted cheese without frantically flipping anything on the stove. The approach — assemble, bake, and finish with crisp fresh toppings — delivers the best of both textures: a crunchy shell that doesn’t go soggy and a melted, slightly browned cheese crown that brings the whole bite together.
What makes this version special is the balance between a well-seasoned beef filling and bright, fresh garnishes. The beef simmers briefly in tomato sauce or your favorite salsa so the filling stays juicy without leaking into the shell, and the oven step both melts the cheese and crisps the shells to a lovely golden finish. Every family member who’s tried it remembers the first time: kids love the melty cheese, adults appreciate the hands-free oven finish, and the whole table enjoys assembling the final taco with toppings exactly how they like them.
Why You'll Love This Recipe
- Ready in about 30 minutes from start to finish — quick enough for weeknights yet satisfying enough for company, thanks to a short stovetop finish and a baking step that does most of the work.
- Uses pantry staples and flexible ingredients: one pound of ground beef, a packet of seasoning (or a homemade mix), and common toppings you likely have on hand.
- Hands-off oven baking crisps shells and melts cheese evenly, so you avoid soggy bottoms and unevenly heated fillings.
- Make-ahead friendly: cook the meat ahead and reheat in the oven for quick assembly; fillings freeze well for busy days.
- Crowd-pleasing and customizable: swap proteins, cheeses, or shells to accommodate dietary needs or what's in your pantry.
- Minimal cleanup: everything assembles in a single baking dish after browning the filling in one skillet.
In my kitchen this method quickly became a staple — once, hosting a last-minute neighborhood potluck, I doubled the batch and baked two dishes side by side; people kept asking where I’d ordered them from. Little details like draining excess fat from the beef and finishing the meat with a splash of tomato sauce make each bite rich but tidy, and family members often fight over the last melty one.
Ingredients
- 1 lb ground beef (80/20 preferred): Choose freshly ground beef from your butcher or a well-trusted supermarket brand; the higher fat percentage gives juicier filling and better mouthfeel. If you prefer leaner, use 85/15 and reduce simmer time slightly to avoid dryness.
- 1 small onion, finely diced: Yellow or sweet onion works best for balance; dice small so it softens quickly during browning and integrates into the meat.
- 2 cloves garlic, minced: Fresh garlic adds brightness — press or finely mince so it distributes evenly without leaving raw bites.
- 1 packet taco seasoning (or homemade mix): Use your favorite brand or combine chili powder, cumin, paprika, onion powder, garlic powder, oregano, and salt for a homemade mix.
- 2/3 cup tomato sauce or salsa: I often use a medium-spiced salsa for extra flavor and a touch of acidity; tomato sauce keeps the filling smoother.
- Salt & pepper to taste: Adjust at the end after tasting the filling — seasoning levels can vary with pre-made mixes and salsa brands.
- 8 hard taco shells: Brands like Old El Paso are common, but corn-based shells are an alternative if you need gluten-free options — check the package label.
- 2 cups shredded cheese (cheddar, Monterey Jack, or Mexican blend): Freshly shredded cheese melts better than pre-shredded (which often contains anti-caking agents).
- 1 cup shredded lettuce, 1/2 cup diced tomatoes, 1/4 cup diced red onion, 2 tbsp chopped cilantro (optional): Crisp, cold toppings contrast the warm filling — prepare them right before serving for best texture.
- Sour cream, guacamole, jalapeño slices, hot sauce (optional): Add as desired to customize each taco; these condiments lift the final bite and balance richness.
Instructions
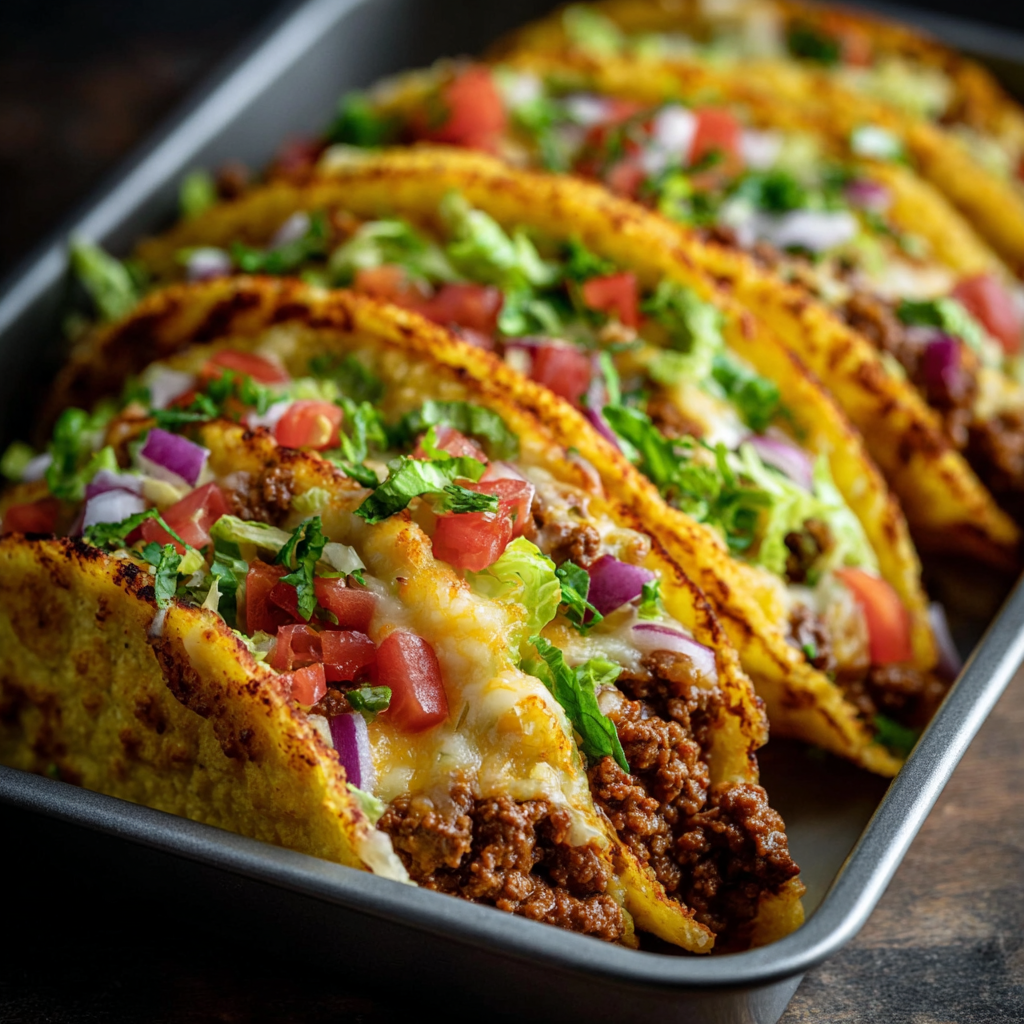
Preheat the oven: Set your oven to 400°F (200°C). Arrange eight hard taco shells upright in a 9x13-inch baking dish or another snug ovenproof pan so they support one another and stay upright as you fill them. Brown the beef and onion: Heat a large skillet over medium-high heat, add the ground beef and diced onion, and cook, breaking up the meat with a spatula, until no pink remains and the onion is translucent — about 6–8 minutes. Drain excess fat into a heatproof container, leaving a little for flavor if using 80/20 beef. Finish the filling: Return the skillet to medium heat, add the minced garlic and the taco seasoning, and stir for 1 minute to bloom the spices. Pour in 2/3 cup tomato sauce or salsa, reduce to a simmer, and cook for 4–6 minutes until the mixture thickens slightly but remains moist. Taste and adjust salt and pepper. The sauce should cling to the meat so it won’t make the shells soggy. Assemble the shells: Spoon the seasoned beef evenly among the eight shells (roughly 1/8 of the filling per shell). Pack gently so each shell is full but not overflowing. Add the cheese and bake: Top each filled shell generously with shredded cheese. Place the baking dish in the preheated oven and bake for 10–15 minutes, watching for the cheese to melt and the shell edges to turn a light golden brown — the exact time depends on your oven and shell brand. Top and serve: Remove the dish from the oven, add shredded lettuce, diced tomatoes, red onion, and cilantro. Serve warm with sour cream, guacamole, jalapeños, or hot sauce on the side.
You Must Know
- Drain excess fat from the browned beef to avoid greasy shells; leave a tablespoon if you want extra flavor.
- Use 2/3 cup of slightly thick tomato sauce or a chunky salsa so the filling stays cohesive and won’t leach into the shell.
- Arrange taco shells snugly in the baking dish so they support each other and don't tip during baking.
- Freshly shredded cheese melts more smoothly than pre-shredded varieties, producing a silkier finish.
- These can be prepared ahead: cook the filling and refrigerate up to 48 hours, then assemble and bake when ready.
My favorite part is the family-style assembly: everyone builds their own taco at the table. It transforms a simple meal into an event, and the oven step makes the whole experience feel a little celebratory even on ordinary nights. We often pair this with rice and beans or a quick corn salad for a balanced, satisfying dinner.
Storage Tips
Store leftover filling in an airtight container in the refrigerator for up to 3 days. For best texture, store components separately: keep the baked shells and cheese assembled in the fridge for up to 24 hours, but note shells will soften over time; it's better to keep shells in their original packaging in a cool, dry place. Freeze cooked filling for up to 3 months in a freezer-safe bag, thaw overnight in the fridge, reheat on the stovetop with a splash of water, and assemble into fresh shells. Reheat assembled tacos in a 350°F oven for 6–8 minutes to refresh crispness and melt cheese.
Ingredient Substitutions
Swap ground beef for ground turkey or chicken for a leaner option — increase the tomato sauce slightly to keep the filling moist. For vegetarian versions, use cooked lentils, crumbled tempeh, or a plant-based ground alternative seasoned the same way. Replace hard shells with soft flour or corn tortillas and turn this into folded enchiladas by layering filling and cheese in a pan topped with enchilada sauce. Use a dairy-free cheese and skip sour cream to make it dairy-free — be aware melting and flavor will differ slightly.
Serving Suggestions
Serve these with a bright citrusy slaw or a quick cilantro-lime rice to add freshness. For a crowd, offer bowls of shredded lettuce, pico de gallo, pickled red onions, sliced radishes, and lime wedges so guests can customize. A side of refried or black beans and a small green salad keeps the meal balanced. Garnish with chopped cilantro and a drizzle of crema or a spoonful of guacamole for richness.
Cultural Background
These oven-finished tacos are an Americanized, home-cook adaptation of traditional Mexican tacos that emphasizes convenience and family-style serving. Hard-shell tacos became popular in the United States in the mid-20th century and evolved into many regional interpretations. This method borrows the handheld appeal of classic tacos while using the oven to streamline finishing and ensure consistent texture — a practical twist born in busy kitchens seeking both authenticity and ease.
Seasonal Adaptations
Summer: Use fresh pico de gallo instead of canned salsa for brighter flavor and add grilled corn kernels for sweetness. Fall/Winter: Stir roasted peppers and caramelized onions into the filling for deeper, comforting flavors. Holiday twist: offer chopped roasted sweet potato and black beans alongside the beef for a heartier, autumnal variation.
Meal Prep Tips
Cook a double batch of the seasoned filling and portion into meal-size containers for quick weeknight dinners; it reheats beautifully on the stovetop or microwave. Keep toppings prepped in separate containers in the fridge and assemble fresh each night. Use stackable 8x8 baking dishes to bake multiple batches at once for meal-prep lunches. Label and date frozen portions to rotate through busy weeks.
Between the quick stovetop work and the oven finish, these cheesy baked tacos deliver dependable results every time. Invite friends, set out toppings, and let everyone build their perfect taco — it’s a simple way to turn an ordinary meal into something memorable.
Pro Tips
Drain most of the fat after browning the beef to prevent greasy shells, leaving about a tablespoon for flavor.
Use freshly shredded cheese for the smoothest melting; pre-shredded cheese contains anti-caking agents that can affect texture.
Arrange shells snugly in the pan so they support each other and stay upright while baking.
Simmer the filling until slightly thickened so it clings to the meat and doesn’t leak into the shell.
Prepare toppings just before serving to maintain crunch and freshness.
This nourishing oven-baked cheesy tacos recipe is sure to be a staple in your kitchen. Enjoy every moist, high protein slice — it is perfect for breakfast or as a wholesome snack any time.
FAQs about Recipes
Are these tacos gluten-free?
Yes — you can use corn shells labeled gluten-free; if using flour shells, check for wheat. To make fully gluten-free, use certified gluten-free taco shells and verify taco seasoning ingredients.
How do I reheat leftovers without making shells soggy?
Store the filling and toppings separately and reheat the filling on the stovetop with a splash of water or in the microwave, then assemble into fresh shells and bake briefly to regain crispness.
Tags
Oven-Baked Cheesy Tacos
This Oven-Baked Cheesy Tacos recipe makes perfectly juicy, tender, and flavorful steak every time! Serve with potatoes and a side salad for an unforgettable dinner in under 30 minutes.
Ingredients
Filling
Shells & Cheese
Toppings
Instructions
Preheat oven
Preheat oven to 400°F (200°C). Arrange the hard taco shells upright in a 9x13-inch baking dish so they support each other.
Brown beef and onion
Heat a large skillet over medium-high heat. Add 1 lb ground beef and 1 small diced onion and cook until beef is no longer pink and onion is translucent, about 6–8 minutes. Drain excess fat.
Season and simmer
Add 2 cloves minced garlic and 1 packet taco seasoning to the skillet; stir for 1 minute. Pour in 2/3 cup tomato sauce or salsa and simmer for 4–6 minutes until slightly thickened. Adjust salt and pepper.
Assemble tacos
Spoon the seasoned beef evenly into the prepared shells (approximately 1/8 of the filling per shell). Top each with shredded cheese.
Bake until melty
Bake in the preheated oven for 10–15 minutes, watching for melted cheese and lightly golden shell edges. Remove when cheese is melted and shells are crisp.
Add fresh toppings and serve
Top with shredded lettuce, diced tomatoes, red onion, and cilantro. Serve warm with sour cream, guacamole, and hot sauce on the side.
Last Step: Please leave a rating and comment letting us know how you liked this recipe! This helps our business to thrive and continue providing free, high-quality recipes for you.
Nutrition
Did You Make This?
Leave a comment & rating below or tag
@easywhiskrecipes on social media!
Categories:
You might also like...

Instant Pot Creamy Chicken and Rice
A quick and comforting one pot dinner of tender chicken, creamy rice, and vegetables cooked together in the Instant Pot for an easy weeknight meal.

Cinnamon Roll Pancake Stacks
Fluffy pancakes swirled with a warm cinnamon filling and finished with a silky cream cheese glaze. Perfect for weekend brunches and cozy mornings.

Caramel Apple Cheesecake Bars
Buttery graham crust, creamy cheesecake, spiced Granny Smith apples, crunchy streusel, and a ribbon of homemade caramel — perfect dessert bars for gatherings.
Did You Make This?
Leave a comment & rating below or tag @easywhiskrecipes on social media!
Rate This Recipe
Share This Recipe
Enjoyed this recipe? Share it with friends and family, and don't forget to leave a review!
Comments (1)
This recipe looks amazing! Can't wait to try it.
Comments are stored locally in your browser. Server comments are displayed alongside your local comments.

Hi, I'm Sophie!
What's Popular

30-Minute Meals!
Join to receive our email series which contains a round-up of some of our quick and easy family favorite recipes.