
>>

Golden, bite-sized stuffing balls with savory herbs, sautéed vegetables, and a crisp exterior—perfect as a make-ahead side or handheld holiday treat.

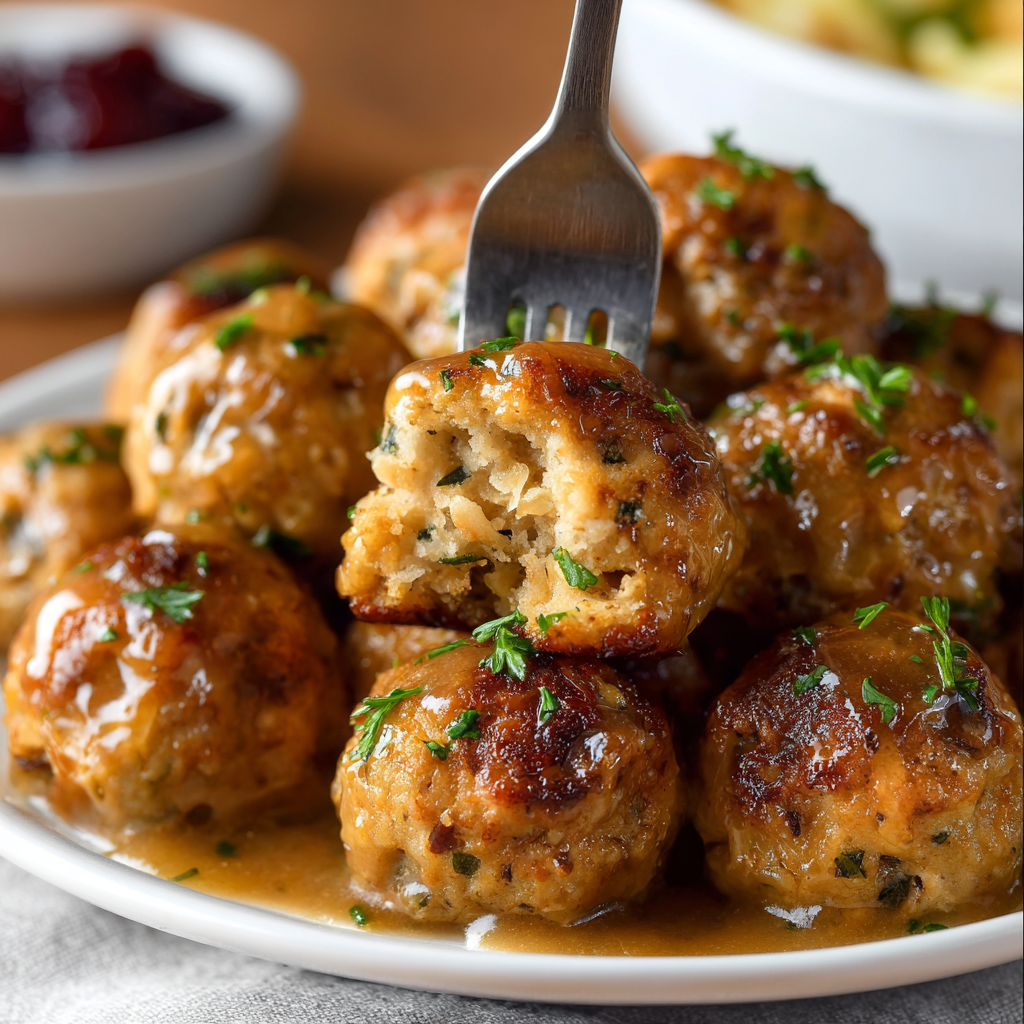
This recipe for Thanksgiving stuffing balls is one of those comforting, hands-on dishes that instantly brings the holidays to the kitchen. I first developed this version when I wanted all the flavors of classic stuffing but in a finger-food format that worked for cocktail-hour guests and family members who prefer smaller portions. The mixture is buttery and herb-forward, with a soft, pillowy interior that contrasts with a crisp, golden crust. Because the base is day-old bread, the texture is just right—chewy pockets that soak up savory broth and aromatics without turning soggy.
I discovered this approach during a busy holiday season when oven space was limited and I needed a versatile side that could double as an appetizer. Shaping the mixture into golf-ball-sized portions made timing predictable and plating effortless. What makes these memorable is the balance between the browned exterior and the tender middle, plus the pop of fresh parsley and optional Parmesan for a slightly nutty finish. My family reaches for these first—kids especially love the ball shape—and they travel well for potlucks, too.
Personally, I love how the aroma of sautéed celery and onion fills the house while these bake—it's the same comforting scent that signals the holidays. One year I prepared a double batch and watched guests happily snack on them while I finished the roast; they vanished faster than any other side I set out.
One of my favorite memories is packing a picnic with these and a roast chicken for an autumn hike; they traveled beautifully and were just as crisp when reheated on a camp stove. At our large family dinner last year, guests complimented the easy serving format—people loved being able to graze and try other sides without committing to a large spoonful of stuffing.
Cool the balls completely before storing to prevent condensation and sogginess. Refrigerate in a single layer on a baking sheet for 30 minutes to set, then transfer to an airtight container with parchment between layers. Keep refrigerated up to 3 days. For freezing, flash-freeze on a sheet for 1 hour, then move to a zipper bag or airtight container; they can be reheated from frozen at 350°F for 12–18 minutes. Microwaving will soften the crust; for best texture, re-crisp in the oven or a toaster oven.

To make a vegetarian version, substitute vegetable broth for the chicken/turkey broth and omit any meat additions. For a richer profile, stir in 1/2 cup cooked and crumbled breakfast sausage or 1 cup sautéed mushrooms—both lend savory depth. If you don’t have parsley, use chives or tarragon sparingly. Gluten-free bread works but choose a sturdy variety; you may need slightly less broth because some GF breads are denser.
Serve warm as a side to roast turkey, glazed ham, or alongside a simple green salad for contrast. Garnish with extra chopped parsley and a light drizzle of pan juices or gravy for a plated presentation. For appetizer service, arrange on a platter with toothpicks and a small bowl of cranberry dip, aioli, or pan gravy for dunking. These also pair beautifully with roasted root vegetables and Brussels sprouts for a seasonal board.
Stuffing has deeply rooted traditions across many cultures, often reflecting local breads and herbs. In the United States, herb-seasoned bread stuffing became synonymous with Thanksgiving, where regional variations include cornbread-based mixes in the South or sausage and oyster additions in New England. Transforming stuffing into individual balls is a modern adaptation that borrows the flavors of classic preparations while offering convenience and portability for contemporary entertaining.
Autumn calls for swapping parsley for chopped sage and adding roasted butternut squash or chopped apples for sweetness. In winter, incorporate cranberries and toasted walnuts for holiday contrast. Spring and summer versions benefit from lighter broths and fresh herbs like basil or mint; reduce the butter slightly and add lemon zest for brightness.
Assemble and shape the balls a day ahead, place them on a parchment-lined tray, cover tightly, and keep refrigerated. This reduces stress on the day of serving—simply bake them off while your main roast rests. For large gatherings, double the mixture and freeze half of the shaped balls; thaw overnight in the refrigerator before baking. Use disposable parchment-lined pans if you’re short on oven space to speed cleanup.
These stuffing balls capture the spirit of the holiday while offering flexibility for modern entertaining—easy to scale, simple to finish, and always a crowd favorite. Make them your own with a pinch more herb or a swap of add-ins, and you’ll have a new tradition on your table.
Toast the bread cubes until dry but not browned; this prevents a gummy interior and ensures even absorption of broth.
Use slightly damp hands when shaping to prevent sticking and to help form smooth balls.
Add the broth slowly—stop when the mixture holds together when pressed; you can always add more but you can’t remove excess liquid.
Rotate the baking sheet halfway through cooking to promote even browning and a uniformly crisp exterior.
For extra crispness, broil for 1–2 minutes at the end while watching closely to avoid burning.
This nourishing thanksgiving stuffing balls recipe is sure to be a staple in your kitchen. Enjoy every moist, high protein slice — it is perfect for breakfast or as a wholesome snack any time.
Yes. Cool completely, then freeze on a sheet pan for 1 hour and transfer to a freezer-safe bag for up to 3 months. Reheat from frozen at 350°F for 12–18 minutes.
Use vegetable broth and omit Parmesan to make the recipe vegetarian. For vegan, replace eggs with a flax egg and use vegan butter and vegetable broth; texture will be slightly different.
This Thanksgiving Stuffing Balls recipe makes perfectly juicy, tender, and flavorful steak every time! Serve with potatoes and a side salad for an unforgettable dinner in under 30 minutes.
Spread bread cubes on a baking sheet and toast at 300°F (150°C) for 10–12 minutes until dry but not browned. Let cool before combining.
Melt butter in a large skillet over medium heat. Add onion and celery and sauté 6–8 minutes until soft. Add garlic in the last 1–2 minutes until fragrant.
In a large bowl, combine toasted bread, sautéed vegetables, poultry seasoning, salt, pepper, parsley, and Parmesan if using. Stir in the beaten eggs to bind.
Slowly pour in 1 1/2 cups broth while mixing until the bread is moist and holds together when pressed; avoid making it soggy.
With damp hands, form the mixture into golf-ball-sized portions and place on a greased or parchment-lined baking sheet about 1 inch apart.
Preheat oven to 375°F (190°C) and bake for 20–25 minutes until golden brown and crisp on the outside. Let rest 5 minutes before serving.
Last Step: Please leave a rating and comment letting us know how you liked this recipe! This helps our business to thrive and continue providing free, high-quality recipes for you.
Leave a comment & rating below or tag
@easywhiskrecipes on social media!

A quick and comforting one pot dinner of tender chicken, creamy rice, and vegetables cooked together in the Instant Pot for an easy weeknight meal.

Fluffy pancakes swirled with a warm cinnamon filling and finished with a silky cream cheese glaze. Perfect for weekend brunches and cozy mornings.

Buttery graham crust, creamy cheesecake, spiced Granny Smith apples, crunchy streusel, and a ribbon of homemade caramel — perfect dessert bars for gatherings.
Leave a comment & rating below or tag @easywhiskrecipes on social media!
Enjoyed this recipe? Share it with friends and family, and don't forget to leave a review!
This recipe looks amazing! Can't wait to try it.
Comments are stored locally in your browser. Server comments are displayed alongside your local comments.

Join to receive our email series which contains a round-up of some of our quick and easy family favorite recipes.
